
Growing sweet potatoes from those bought at the grocery store and using a soil bag for cultivation is a rewarding and straightforward gardening project. Here’s how you can successfully sprout and grow sweet potatoes in a bag of soil:
Step 1: Choose Your Sweet Potatoes
Select a few healthy, organic sweet potatoes from your local grocery store. Organic is key because non-organic sweet potatoes might be treated to prevent sprouting.
Step 2: Sprouting the Sweet Potatoes
-
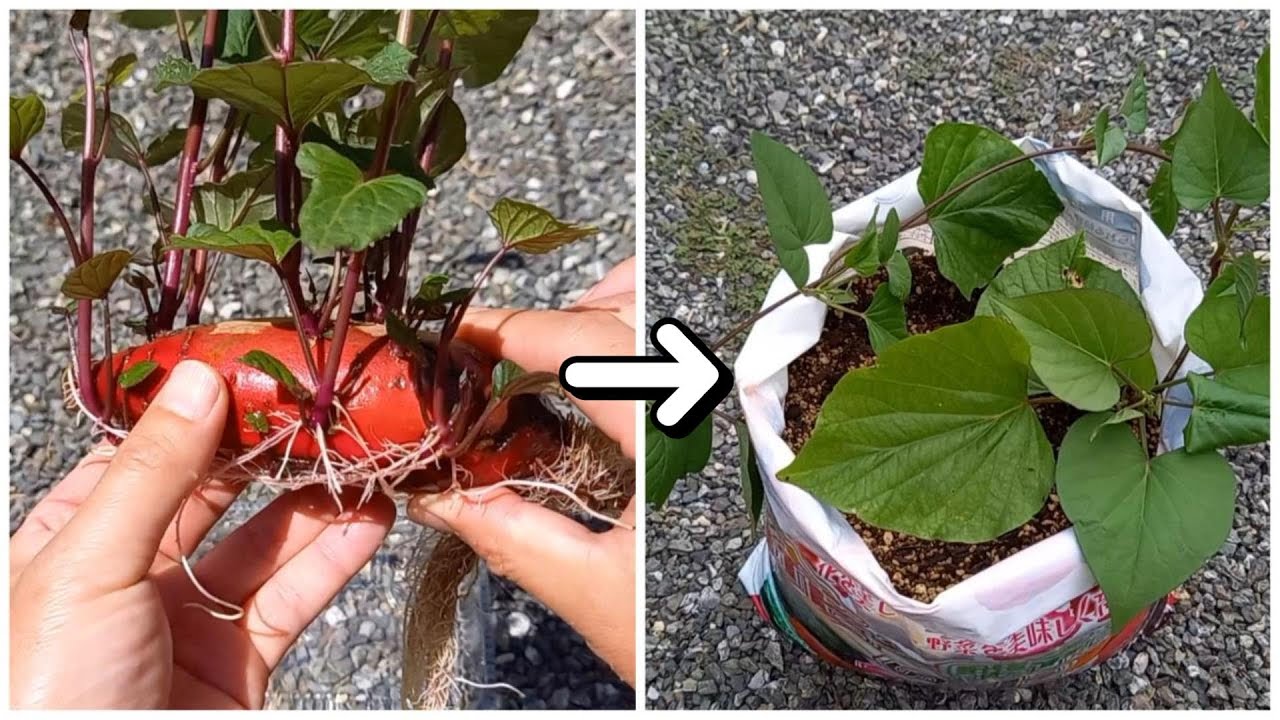
Cut the Sweet Potatoes: You can start whole sweet potatoes or cut them into large sections. Each piece should have at least one or two ‘eyes’ or buds.
-
Start the Sprouts: Submerge half of the sweet potato in a jar of water using toothpicks to hold it at the rim. Place the jar in a sunny window. Change the water every few days to keep it fresh.
-
Wait for Sprouts: In a few weeks, you should see sprouts emerging from the eyes. These sprouts are called “slips.” Once the slips grow a few inches tall and have several leaves, they are ready to be planted.
Step 3: Preparing the Slips
-
Remove Slips: Gently twist off or cut the slips from the sweet potato once they are about 4-6 inches tall.
-
Root the Slips: Place the slips in a shallow bowl of water with the bottom half submerged. In a week or so, roots will begin to form.
Step 4: Prepare the Soil Bag
-
Choose a Soil Bag: Purchase a large bag of high-quality potting soil. Sweet potatoes prefer well-draining, slightly acidic soil.
-
Prepare the Bag: Lay the bag flat in a sunny location where it can remain undisturbed. Cut several drainage holes in the bottom. Then, cut a large opening on the top side of the bag to plant your slips.
Step 5: Planting the Slips
-
Planting: Space the slips about 12 inches apart, burying them up to the top leaves in the soil.
-
Watering: Water the slips thoroughly after planting. Keep the soil moist but not waterlogged, as sweet potatoes do not like soggy conditions.
Step 6: Care and Maintenance
-
Sunlight: Ensure the bag gets full sun, ideally 6-8 hours of direct sunlight daily.
-
Watering: Water regularly to keep the soil evenly moist, especially during dry periods.
-
Feeding: Fertilize with a balanced, low-nitrogen fertilizer a few weeks after planting to support growth without promoting too much foliage.
Step 7: Harvesting
-
Harvest Time: Sweet potatoes generally take about 4-6 months to mature, depending on the variety. The leaves will start to yellow and die back when they are ready.
-
Digging Up: Carefully open the side of the bag and remove the soil to extract the sweet potatoes. Handle them gently to avoid bruising.
Step 8: Curing and Storage
-
Curing: Allow the sweet potatoes to cure in a warm, dry, and well-ventilated place for about 10 days. This process helps to heal any cuts and thicken the skins.
-
Storage: Store the cured sweet potatoes in a cool, dark place. Properly cured sweet potatoes can last several months.
This method of growing sweet potatoes in a soil bag is not only space-efficient but also a fun and engaging way to produce a sizable crop with minimal garden space. Enjoy the process and the tasty rewards of your harvest!