Are you looking for a clever way to make the most of your resources and save some money? Transforming a bar of soap into liquid soap is a fantastic and cost-effective solution that you can easily do at home! Say goodbye to store-bought liquid soap and hello to your personalized liquid soap with all the benefits you love. Let’s dive into the simple steps to create your DIY liquid soap.
Ingredients and Materials:
1 bar of soap: Pick your favorite type, whether it’s moisturizing, antibacterial, or scented.
4 cups of water: Adjust based on how thick or runny you want the liquid soap to be.
A large pot: For boiling your liquid soap mixture.
Grater or knife: To grate or chop the bar of soap into small flakes.
A container: Choose between a pump bottle or jar for storing your liquid soap.
Optional:
Essential oils: Add for extra fragrance or benefits to your liquid soap.
Instructions:
-
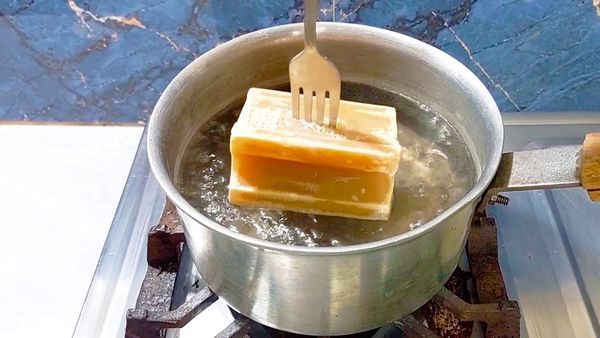
Grate or Chop the Soap: Use a grater or knife to finely chop the bar of soap into small flakes. This helps it dissolve faster in boiling water.
-
Boil the Water: Bring 4 cups of water to a boil in a large pot. Adjust the water amount based on your desired consistency for the liquid soap.
-
Add the Soap Flakes: Once the water is boiling, reduce the heat to a simmer and add the grated soap. Stir continuously until all the soap flakes are dissolved.
-
Cool and Thicken: Turn off the heat and let the mixture cool. As it cools, the soap will thicken. Stir occasionally to ensure an even consistency.
-
Customize (Optional): Enhance your liquid soap by adding a few drops of essential oils like lavender, tea tree, or peppermint for fragrance or additional benefits.
-
Transfer and Store: Once the soap has cooled and reached your desired consistency, pour it into a container or pump bottle for easy use.
Tips:
- Consistency Adjustment: If your liquid soap is too thick after cooling, add more water and stir until you reach your preferred texture. If it’s too thin, reheat and add more grated soap.
- Foaming Option: For a foaming hand soap, use a foam pump dispenser and dilute the liquid soap further with water.
- Reuse Containers: Save empty liquid soap bottles or jars to store your DIY soap, reducing waste even further.
Uses for DIY Liquid Soap:
- Hand Soap: Refill your hand soap dispensers.
- Body Wash: Enjoy it as a body wash in the shower.
- Cleaning Solution: Use it for light household cleaning tasks.
By creating your DIY liquid soap from a single bar of soap, you not only save money but also have the freedom to control the ingredients, reduce waste, and customize it according to your preferences. It’s a simple, sustainable, and practical solution for your daily routine!