
Mixing tomato and boiling milk might sound unusual, but it is a brilliant “kitchen hack” for making fresh, organic cheese at home. Most people use vinegar or lemon to curdle milk, but the natural acidity in a ripe tomato works just as well. This method not only separates the milk into soft curds but also infuses the cheese with a delicate, creamy flavor and healthy lycopene.
By making your own cheese, you avoid the preservatives, excess salt, and “gums” found in store-bought versions. In just a few minutes, you can transform simple milk into a soft, spreadable cheese that is perfect for breakfast, salads, or sandwiches. It is a great way to save money and ensure your family is eating something 100% natural.
Why the Tomato and Milk Combination is So Effective
- Natural Curdling Agent: The citric and malic acids in tomatoes react with the milk proteins to separate the solids (curds) from the liquid (whey) instantly.
- Adds Vitamins: Tomatoes add Vitamin C and antioxidants to the cheese, making it more nutritious than plain white cheese.
- Superior Texture: Using tomato results in a very soft, “ricotta-style” texture that is much creamier than cheese made with harsh vinegars.
- Cost-Efficient: You can make a large batch of fresh cheese for the price of a single carton of milk and one vegetable.
Recipe for the Three-Ingredient Fresh Tomato Cheese
This recipe is fast, fun, and produces a beautiful, light pink cheese that looks as good as it tastes.
Ingredients:
- 1 Liter of Whole Milk (Fresh, full-fat milk works best for the most cheese)
- 1 Large Ripe Tomato (The redder and juicier, the better)
- A pinch of Sea Salt
Instructions:
- The Juice: Grate the tomato or blend it until it is a liquid. Pass it through a sieve to remove the skin and seeds so you are left with pure tomato juice.
- The Boil: Pour the milk into a large pot and bring it to a boil over medium heat. Stir occasionally to make sure it doesn’t burn on the bottom.
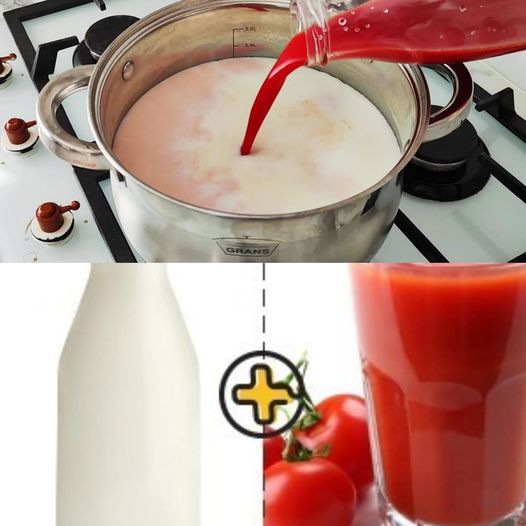
- The Pour: As soon as the milk starts to rise and bubble, pour in the tomato juice.
- The Magic: Stir gently for 1 minute. You will see the milk immediately separate into white/pink clumps (the cheese) and a yellowish liquid (the whey).
- The Strain: Line a colander with a clean cheesecloth or a thin kitchen towel. Pour the mixture through the cloth.
- The Flavor: While the cheese is still warm in the cloth, sprinkle in the sea salt and mix it gently.
- The Press: Squeeze the cloth to remove the excess liquid. If you want a firm cheese, place a heavy plate on top for 30 minutes. If you want a creamy spread, you can eat it immediately!
Three Ways to Enjoy Your Homemade Cheese
- The Morning Toast: Spread the warm cheese on crusty bread and top with a little black pepper and olive oil.
- The Salad Topper: Crumble the chilled cheese over fresh greens and cucumbers for a light, healthy lunch.
- The Pasta Sauce: Stir the soft curds into hot pasta; they will melt slightly to create a rich, tomato-cream sauce.
Three Tips for the Perfect Homemade Cheese
- Don’t Throw Away the Liquid: The yellowish liquid (whey) is full of protein! You can use it to make bread, add it to smoothies, or use it to water your garden plants.
- Use Whole Milk: Avoid using “skim” or “non-fat” milk, as there isn’t enough fat to create solid cheese curds.
- Add Herbs: If you want more flavor, you can stir in some fresh basil or oregano while the cheese is draining in the cloth.
A Friendly Tip for Success
You’ll know your “Tomato Cheese” is a success when the liquid in the pot looks clear and yellow, not white. This means you have successfully captured all the milk solids! Once you taste how fresh and sweet this cheese is, you truly won’t want to go back to the processed blocks from the store.