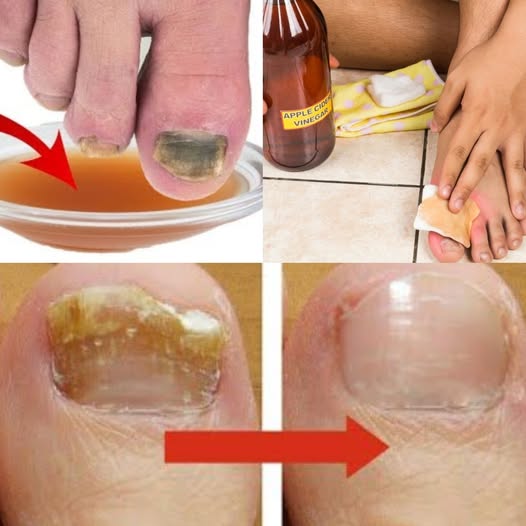

Using apple cider vinegar on your feet is a smart move that acts like a natural acid-shield and fungal-spark for your nails. This “fast-acting treasure” works so well because the acetic acid “attacks” the “heavy” buildup of fungus and “stops” the “dull” yellow look of thickened nails. It is an easy and 100% cheap way to “fix” brittle edges, “erase” the “stale” scent of foot infections, and “keep” your nail beds balanced, leaving your toenails feeling clear and translucent almost immediately.
Instead of spending money on expensive prescription creams or specialty lacquers that take months to work, this pantry staple “commands” your skin and nails to reset their pH levels. It works by creating an environment where fungus cannot survive and “making” the “heavy” feeling of irritation “go away.” Once you “try” this zesty and powerful trick, you will be surprised at how “quickly” your nail color clears and why your feet stay fresh every day!
Why Apple Cider Vinegar is a Total-Nail Treasure
- The Fungus Eraser: Acetic acid “helps” kill the microbes that cause yellowing and crumbling, taking away the “cloudy” look and keeping the nail clear.
- The pH Guard: Vinegar “tells” the skin to return to its natural acidity, helping to “stop” the spread of infections fast.
- The Thickness Fix: The soak “attacks” the hard keratin buildup, getting rid of the “bulky” feeling of infected nails and making them easier to trim.
- The Odor Spark: Natural enzymes “give” your feet a deep-cleanse, reducing the “sour” feeling of trapped sweat and bacteria.
- The Skin Lift: This mix “soaks into” the cracks around the nail, giving you an instant boost in protective hygiene.
Recipe for the “Fast-Action” Vinegar Soak
This is the best way to mix the soak so the “active acids” penetrate the hard surface of the nail and reach the nail bed.
Ingredients:
- 1 part Apple Cider Vinegar
- 1 part warm water
- 2 tablespoons of Epsom salt
Instructions:
- The Base: Fill a small basin with the warm water. This “helps” the skin soften “instantly” for better absorption.
- The Mix: Pour in the apple cider vinegar and the Epsom salt. This “starts” the neutralizing process “immediately” as the salt dissolves.
- The Soak: Submerge your toes for 15 to 20 minutes. This “tells” the acid to penetrate the deep-seated stains in the nail.
- The Focus: Gently scrub the nails with an old toothbrush while they are wet. This “signals” the fungus to lift away from the surface.
- The Dry: Dry your feet completely, especially between the toes. This “gives” the fungus no place to hide from the treatment.
- The Result: An instant feeling of freshness and a clear increase in nail softness within just a few days of consistent use.
Three Tips for Professional Results
- The “Mother” Rule: You should use apple cider vinegar with “the mother”! This “is” where the strongest enzymes and probiotics stay, so choosing “the cloudy kind” helps you get the best results for your nails.
- The Nighttime Secret: After the soak, apply a drop of tea tree oil to the infected nail. It “works” to ensure the “protection” stays active while you sleep, making your “healing” fast and effective.
- The Consistency Habit: Use this soak every day for at least two weeks. Persistence “is” how you protect your new nail growth, making your “beauty routine” feel easy and powerful.
A Simple Final Tip
You’ll know the Vinegar-Nail Secret is working when you realize the “yellow color is fading away” and your “new growth looks perfectly healthy!” It is the best way to save money using a simple treasure from your kitchen cupboard.